The fire is almost out. The highway is back open - they opened it at 11 am - AFTER I made the marathon drive down. But coming home was nice this evening.
Thanks for all the words of encouragement and support!
I'll be back to cooking posts beginning tomorrow!
Thursday, August 31, 2006
Thursday Morning Update
I'm at my office. It took me 2 1/2 hours to get here, when it normally takes 15 minutes. But I'm here! Highway 38 is still closed, since fire officials have a concern about hot spots. But you can ( and I did) go from Forest Falls UP the mountain north, then east, then northwest to Big Bear Lake, then southwest to Running Springs, and then south into Highland, then southeast to Yucaipa. It normally takes me abut 15-20 minutes to do the same trip via Highway 38, and this morning it took me 2 1/2 hours.
The fire is 80% contained, based on information I got on the news.
If the road is still closed this evening, I'll spend the night with my office manager, since I brought my suitcase and pillow.
Later.
The fire is 80% contained, based on information I got on the news.
If the road is still closed this evening, I'll spend the night with my office manager, since I brought my suitcase and pillow.
Later.
Wednesday, August 30, 2006
Wednesday Morning Update - now with pictures
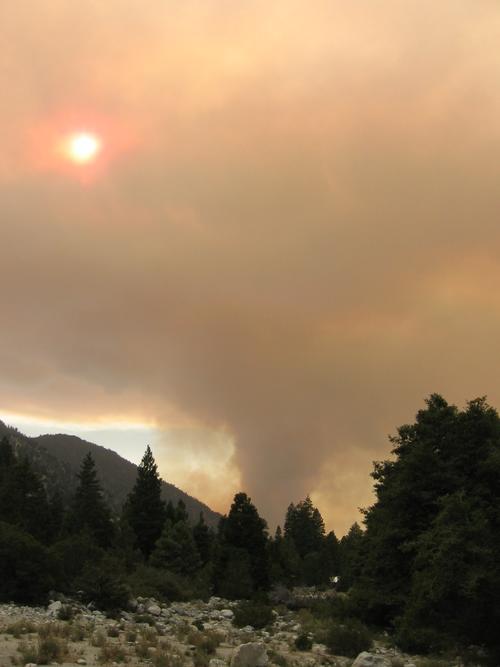
This is what we could see yesterday afternoon from Forest Falls. It's looking west down-canyon.
I'm still at home - the fire is burning easterly, which forced a mandatory evacuation of Mountain Home Village. It burned right to the edge of Highway 38; it's hoped that it will burn to the edge of last year's Thurman Fire where it will run out of fuel. As long as they can keep it on the northwest side of the highway everything should be okay for us. I read on the inciweb site that a voluntary evacuation was called for Forest Falls, but we decided to stay put. I called in for a day off - I could have gone to work but it would have taken three hours to get there (the drive down the 38 is about 20 minutes). I'm hoping they'll reopen the road tomorrow, so we can get out.

If you were looking south to the fire from Rim of the World High School, this is what you saw.

This picture was taken along Highway 38 about 8:30 last night.
Pictures were not taken by me. They're from www.rimoftheworld.net
Tuesday, August 29, 2006
All Packed & Waiting for an Evacuation Order We Hope Doesn't Come
There's a fire burning 6 miles away. What makes it scary is that it's west of here, at the bottom of Mill Creek Canyon, burning towards the northeast. If the winds shift more easterly, it'll come right up our canyon to our little village. The smoke plume is 20,000-30,000 feet high, and enough of it has blown eastward that it's been raining ash for about 4 hours.
I was sitting at Starbuck's with a colleague around 3:30 this afternoon, when my friend Shannon, who lives up in Angelus Oaks, called to tell about the fire and to tell me to get my tail home before they closed the road. I hauled butt out of there, and immediately saw the enormous plume from a fire that had only started at 3:00. As I came down Bryant Street, heading north to the highway towards home, I had to go around dozens of "lookie loos" who were gathered to watch the flames. I made it past the fire, and when I got home 15 minutes later, learned on the California Highway Patrol website that they closed the road right after I got through. So right now, no one can come UP the mountain from the valley, no one can do DOWN the mountain, and if we have to evacuate, it means we go UP the mountain even further to Big Bear. From there, we either go across the Rim of the World and down Waterman Canyon into San Bernardino (a 3-hour drive) or down the back side of Big Bear to Lucerne Valley, and from there either west to Apple Valley or southeast to Morongo Valley (a 3-hour drive).
Our bags are packed, as well as some tubs that have our files and my father's photo albums. DH will load most of it into his truck, and we'll meet up somewhere. As I'm writing this, we have the windows open since it's pretty hot outside and we have no air conditioning up here. The smoke is pretty heavy, but we're getting used to it.
At 3:30 the news reported 10 acres burned; at 4:00 they said it had grown to 20 acres, but then it exploded and as of 6:30 was over 2,000 acres.
(Updates on the fire can be found at http://www.sbcsun.com OR http://www.nbc4.tv OR http://abclocal.go.com/kabc/ OR http://cbs2.com/)
This is not the first time for this. In 2004, when the entire San Bernardino front range burned, destroying 400+ homes near Lake Arrowhead, we were evacuated and spent 4 days in our tent trailer in Yucaipa. In 2005, a fire in Mill Creek Canyon caused us to be evacuated again, and we spent 5 days at a friend's house in Yucaipa. We don't know where we'll go if we evacuate this time - my friend doesn't live in the big house we used last time, and because of the heat, we don't want to use our tent trailer. DH is thinking a hotel somewhere.
I'll update later.
Monday, August 28, 2006
This Inquiring Mind Wants to Know:
1. Can I use whole wheat flour instead of white when I coat meat or fish for frying?
2. Can I use whole wheat flour instead of white when I make a roux for gravy?
That's all I want to know for now.
food & drink
2. Can I use whole wheat flour instead of white when I make a roux for gravy?
That's all I want to know for now.
food & drink
Sunday, August 27, 2006
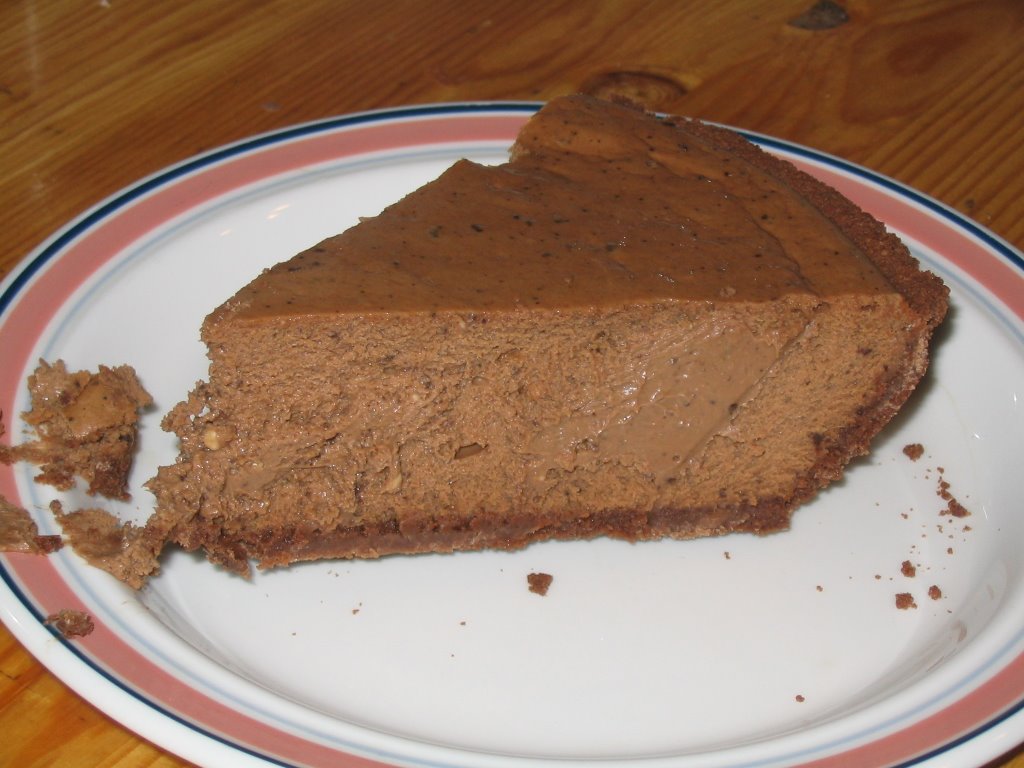
Chocolate Cheesecake, Anyone?
My friend Shannon brought this cheesecake with her last week when she and her husband came for lunch. I took her recipe and lightened it just a bit by using half Splenda and half sugar, and then added some espresso to help mask the Splenda. The resulting cheesecake is a decadent-tasting delight!
Shannon's Chocolate Cheesecake

2 (8oz) pkgs. cream cheese, softened
1/4 c sugar
1/4 c Splenda
1/2 t vanilla
2 t espresso powder, dissoved in 1 T hot water
2 eggs
4 squares Baker's Semi-Sweet Chocolate, melted and slightly cooled
1 Keebler or Nabisco Chocolate Ready Crust
Mix cream cheese, sugar, Splenda, vanilla, and espresso at medium speed with electric mixer until well blended. Add eggs; mix until blended. Blend in melted chocolate. Pour into crust. Bake at 325˚ for 45 minutes or until center is almost set. Cool in fridge at least 3 hours.
food & drink
Shannon's Chocolate Cheesecake
2 (8oz) pkgs. cream cheese, softened
1/4 c sugar
1/4 c Splenda
1/2 t vanilla
2 t espresso powder, dissoved in 1 T hot water
2 eggs
4 squares Baker's Semi-Sweet Chocolate, melted and slightly cooled
1 Keebler or Nabisco Chocolate Ready Crust
Mix cream cheese, sugar, Splenda, vanilla, and espresso at medium speed with electric mixer until well blended. Add eggs; mix until blended. Blend in melted chocolate. Pour into crust. Bake at 325˚ for 45 minutes or until center is almost set. Cool in fridge at least 3 hours.
food & drink
Tuesday, August 22, 2006
I KNEW I belonged back in the '70s!
I'm a sucker for all those quizzes that are making the rounds. I really enjoyed this one. I"ve been saying all along that I'm a "child of the '70s," with my eclectic musical tastes, and this just proved it. Right now I"m listening to Poco, and just finished downloading all my Led Zeppelin, Crosby, Stills, Nash and Young, John Denver, Dan Fogelberg and Eagles CDs to my computer so I can transfer them to my ipod.
What else is on my ipod? Let's see: Bob Dylan, Cat Stevens, Chicago, Dar William, David Gray, David Bromberg, Emmy Lou Harris, Ferron, Firefall, Gordon Lightfood, John Stewart (not the comedian!), Jackson Browne, Jethro Tull, Leonard Cohen, Loreena McKennnitt, Lucinda Williams, Lucy Kaplansky, Michael Murphy, Mindy Smith, The Moody Blues, Nick Drake, Nilsson, Peter Mulvey, Richard Buckner, Richard Shindell, Steely Dan, Tom Rush, Tom Waits, Tori Amos, Tracy Chapman, Train, Yes, Fleetwood Mac, Phil Collilns, and Kenny Loggins.
Anyone wanna share what's on YOUR ipod?
| You Belong in 1975 |
If you scored... 1950 - 1959: You're fun loving, romantic, and more than a little innocent. See you at the drive in! 1960 - 1969: You are a free spirit with a huge heart. Love, peace, and happiness rule - oh, and drugs too. 1970 - 1979: Bold and brash, you take life by the horns. Whether you're partying or protesting, you give it your all! 1980 - 1989: Wild, over the top, and just a little bit cheesy. You're colorful at night - and successful during the day. 1990 - 1999: With you anything goes! You're grunge one day, ghetto fabulous the next. It's all good! |
Monday, August 21, 2006
Just Checking In
Hello all. I've been away from posting for a while, since we just went back to work last week. I've been really busy, since we hosted a breakfast for our 45 new teachers, then had a solidarity picnic that featured California Teachers Association President Barbara Kerr. What a blast that was! I've been cooking a lot at home, but it's all been recipes I've made before. Tonight, for example, I used some more barracuda from the freezer, and made the Parmesan Red Pepper coating I've used on mahi mahi. We had my smoky burgers last night. So I really haven't had anything new to write about except for yesterday morning's coffee cake. I got the recipe back in 1978 from Gladys Ellis. Gladys was a friend of my mother's, and was the mother of Godfrey Ellis, a young man I dated a while in college. Godfrey died about 14 years ago, and I remember him fondly. I've given the original recipe, plus the changes I made to lower the carbs and fat and make it a bit healthier.
Bohemian Coffee Cake
Gladys Ellis, Lubbock, Texas
2 1/2 c all-purpose flour (I used 1 c whole wheat and 1 1/2 c all-purpose)
1 t cinnamon
1 t nutmeg
1/8 t salt
1 t baking powder
1 c buttermilk
1 t baking soda
2 eggs
1 c granulated sugar (I used 1/2 c sugar ad 1/2 c Splenda)
1 c packed brown sugar (I used 1/2 c Splenda brown sugar blend)
1 c oil (I used 1/2 c oil and 1/2 c unsweetened applesauce)
1 t vanilla
1 c chopped pecans
2/3 c sweetened shredded coconut
Preheat oven to 350˚. Mix flour, cinnamon, nutmeg, salt, and baking powder; set aside. Mix buttermilk and soda; set aside. Beat together eggs, sugars, oil, and vanilla until creamy. Alternately add flour mixture and buttermilk to egg mixture until batter is well blended. Shake pecans with a little flour in a bag to coat. Add pecans and coconut to batter. Bake in greased Bundt pan for 45-50 minutes, till toothpick inserted in center comes out clean. Cool 10 minutes in pan; remove from pan to cake rack. Store covered.
Sunday, August 13, 2006
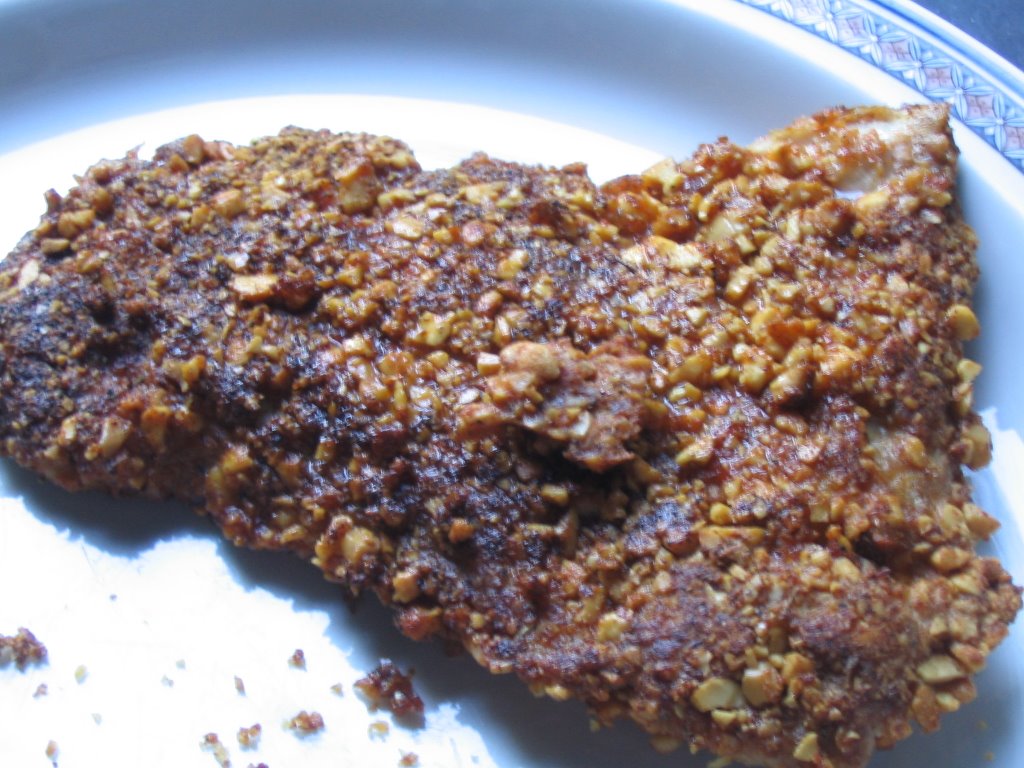
Barracuda Cajun-Style
I used some of the barracuda fillets in my freezer for my next borrowed recipe,
Spicy Peanut-Encrusted Catfish from Christine Cooks. I thought the flavors would go well on the flavorful barracuda DH had caught last month off Marina del Rey. DH loves Cajun food, and I don’t make it often because I’m not too enamored of the seasonings. But this recipe sounded pretty good, and DH LOVED it! I’ll definitely be making it again for him.
Spicy Peanut-Encrusted Catfish
from Christine Cooks

3 catfish fillets (I used barracuda)
1 c dry-roasted, salt-free peanuts, chopped fine
2 T blackening spice (see below)
2 T olive oil or peanut oil
1/2 c Eggbeaters or other egg substitute, or 2 eggs, lightly beaten
Pre-heat oven to 400 degrees and have a baking sheet ready. Blot fillets with paper towels until thoroughly dry. Set aside.With a chef's knife, chop the peanuts until they're in very fine pieces. You could use a small food processor but I like to chop such a small amount with my knife, avoiding the possibility of turning them into peanut butter. Combine the chopped peanuts and the blackening spice and place on a flat plate. Pour the eggs or egg substitute into a wide bowl. Heat a cast iron skillet to medium and add the oil. The oil should just shimmer in the pan, not smoke, or you could burn the peanuts (hmmm, how do I know that...?). Dip a fillet into the eggs to coat then into the peanut mixture, coating both sides and pressing lightly to make the peanut pieces adhere. Repeat with the remaining fillets. Place in the hot skillet and, keeping them from crowding each other, saute for about 5 minutes on one side then flip and saute the other side for another 5 minutes. Remove fillets to a baking sheet and place in a 400 degree oven to finish - about 5 minutes more.
Blackening Spice
from Christine Cooks
5 T kosher salt
5 T paprika (I used sweet)
1 T dried thyme
1 T freshly ground black pepper
1 T garlic powder
1/2 t cayenne
1/2 t ground white pepper
Mix it all up and store in an airtight container.
Our side dish with the fish was onion rings, since I didn’t want to have potatoes, nor did I want to do anything difficult. These onion rings are fat-free, crispy, and ready in 20 minutes.
Baked Onion Rings

2 large sweet onions
2 eggs
1 1/2 c crushed cornflakes
2 t sugar
1 t paprika
1/4 t garlic salt
1/4 t seasoned salt
Cut onions into 1/2-inch slices; separate into rings. In a shallow dish, whisk eggs. In another shallow dish, combine the remaining ingredients. Dip onion rings into eggs, then coat with cornflake mixture. Arrange rings in a single layer on greased baking sheets. Bake at 375˚ for 20-25 minutes or until tender.
food & drink
Spicy Peanut-Encrusted Catfish from Christine Cooks. I thought the flavors would go well on the flavorful barracuda DH had caught last month off Marina del Rey. DH loves Cajun food, and I don’t make it often because I’m not too enamored of the seasonings. But this recipe sounded pretty good, and DH LOVED it! I’ll definitely be making it again for him.
Spicy Peanut-Encrusted Catfish
from Christine Cooks
3 catfish fillets (I used barracuda)
1 c dry-roasted, salt-free peanuts, chopped fine
2 T blackening spice (see below)
2 T olive oil or peanut oil
1/2 c Eggbeaters or other egg substitute, or 2 eggs, lightly beaten
Pre-heat oven to 400 degrees and have a baking sheet ready. Blot fillets with paper towels until thoroughly dry. Set aside.With a chef's knife, chop the peanuts until they're in very fine pieces. You could use a small food processor but I like to chop such a small amount with my knife, avoiding the possibility of turning them into peanut butter. Combine the chopped peanuts and the blackening spice and place on a flat plate. Pour the eggs or egg substitute into a wide bowl. Heat a cast iron skillet to medium and add the oil. The oil should just shimmer in the pan, not smoke, or you could burn the peanuts (hmmm, how do I know that...?). Dip a fillet into the eggs to coat then into the peanut mixture, coating both sides and pressing lightly to make the peanut pieces adhere. Repeat with the remaining fillets. Place in the hot skillet and, keeping them from crowding each other, saute for about 5 minutes on one side then flip and saute the other side for another 5 minutes. Remove fillets to a baking sheet and place in a 400 degree oven to finish - about 5 minutes more.
Blackening Spice
from Christine Cooks
5 T kosher salt
5 T paprika (I used sweet)
1 T dried thyme
1 T freshly ground black pepper
1 T garlic powder
1/2 t cayenne
1/2 t ground white pepper
Mix it all up and store in an airtight container.
Our side dish with the fish was onion rings, since I didn’t want to have potatoes, nor did I want to do anything difficult. These onion rings are fat-free, crispy, and ready in 20 minutes.
Baked Onion Rings

2 large sweet onions
2 eggs
1 1/2 c crushed cornflakes
2 t sugar
1 t paprika
1/4 t garlic salt
1/4 t seasoned salt
Cut onions into 1/2-inch slices; separate into rings. In a shallow dish, whisk eggs. In another shallow dish, combine the remaining ingredients. Dip onion rings into eggs, then coat with cornflake mixture. Arrange rings in a single layer on greased baking sheets. Bake at 375˚ for 20-25 minutes or until tender.
food & drink
Asian Citrus Grilled Chicken, then Fried Rice with the Leftovers
Asian Citrus Grilled Chicken
1/4 c orange juice
1/4 c pineapple juice
1/4 c fresh lemon juice
1/4 c fresh lime juice
2 T ginger, peeled and chopped
2 garlic cloves, crushed
2 T light brown sugar
1/2 c peanut oil
2 T rice vinegar
1/2 t red pepper flakes
1-2 lbs. boneless chicken thighs or breasts
Whisk all ingredients except chicken in a medium bowl until well blended. Pour into a large zip-top plastic bag; add chicken. Marinate several hours in refrigerator. Drain marinade and grill chicken till done.
Whenever I make grilled chicken, I always cook a little extra so I can use the leftovers for fried rice. We like our fried rice with lots of veggies in it so that it’s a good main dish.
Chicken Fried Rice

2 eggs, well beaten
1 c frozen mixed vegetables
1 T Yoshida’s gourmet sauce, optional
1 T canola oil
1 c chopped cooked chicken
3 c cooked white or brown rice
3 green onions, thinly sliced (including green part)
1 c coarsely shredded cabbage
2 T low-sodium soy sauce
Heat a large nonstick skillet sprayed with cooking spray over medium-high heat. Add eggs, tilt pan in a circular motion to coat bottom. Cook egg 1 minute; flip to other side and remove from heat. Once egg “pancake” has cooled, cut in small strips. Cook vegetables in a half cup of water for about 5 minutes; drain. In skillet, heat the gourmet sauce and oil; add chicken and sauté lightly until chicken is coated. Add rice, cabbage, and vegetables, and stir to blend. Add egg strips and green onions, and continue to cook over medium heat until all ingredients are hot. Add soy sauce; heat through. 4 Servings
food & drink
1/4 c orange juice
1/4 c pineapple juice
1/4 c fresh lemon juice
1/4 c fresh lime juice
2 T ginger, peeled and chopped
2 garlic cloves, crushed
2 T light brown sugar
1/2 c peanut oil
2 T rice vinegar
1/2 t red pepper flakes
1-2 lbs. boneless chicken thighs or breasts
Whisk all ingredients except chicken in a medium bowl until well blended. Pour into a large zip-top plastic bag; add chicken. Marinate several hours in refrigerator. Drain marinade and grill chicken till done.
Whenever I make grilled chicken, I always cook a little extra so I can use the leftovers for fried rice. We like our fried rice with lots of veggies in it so that it’s a good main dish.
Chicken Fried Rice
2 eggs, well beaten
1 c frozen mixed vegetables
1 T Yoshida’s gourmet sauce, optional
1 T canola oil
1 c chopped cooked chicken
3 c cooked white or brown rice
3 green onions, thinly sliced (including green part)
1 c coarsely shredded cabbage
2 T low-sodium soy sauce
Heat a large nonstick skillet sprayed with cooking spray over medium-high heat. Add eggs, tilt pan in a circular motion to coat bottom. Cook egg 1 minute; flip to other side and remove from heat. Once egg “pancake” has cooled, cut in small strips. Cook vegetables in a half cup of water for about 5 minutes; drain. In skillet, heat the gourmet sauce and oil; add chicken and sauté lightly until chicken is coated. Add rice, cabbage, and vegetables, and stir to blend. Add egg strips and green onions, and continue to cook over medium heat until all ingredients are hot. Add soy sauce; heat through. 4 Servings
food & drink
Hot Ham & Swiss Sandwiches and Easy Baked Corn
I had some chopped ham in my freezer that needed to be used up, so I made some sandwiches that freeze well for when I have to work late and DH is hungry. The recipe made four sandwiches, so we ate two and froze two.
Hot Ham and Swiss Sandwiches

1/4 c mayonnaise
1 T poppy seeds
2 T horseradish
2 T onion, grated
1 1/2 c thinly sliced or finely diced ham
8 slices Swiss cheese
4 large rye or whole grain hamburger buns
Mix the mayonnaise, poppy seeds, horseradish and onion together. Place a slice of cheese on a bun, top with ham mixture, and place another slice of cheese on top. Wrap in foil. Heat 30 minutes at 350˚.
I served these with a corn recipe from a cookbook my mother gave me for my birthday last month. Mom plays bridge almost every day at the bridge center in Lubbock, Texas. She’s spoken with her friends their about my blog, and two of the women there mentioned that they’d published some cookbooks. She got them to sign one, and gave it to me for my birthday. It’s called Calf Fries to Caviar, and it’s written by Janel Franklin and Sue Vaughn. It has a lot of recipes that I use often; plus a lot that are new to me. I’d swear that Mom contributed many of the recipes, since Janel and Sue cook a lot like Mom.
Everyone knows what Calf Fries are, right? You know, Mountain Oysters? If you don’t, let me know and I can give you information and a recipe or two. But the recipe I used with my ham sandwiches is called Easy Baked Corn.
Easy Baked Corn
From Calf Fries to Caviar by Janel Franklin and Sue Vaughn

1 15-oz. can cream-style corn
1 T cornstarch
1 egg, beaten
1 T sugar
1/4 c milk
salt and pepper to taste
1 T butter, cut in small chunks
Preheat oven to 350˚. Empty corn into small greased baking dish. Combine cornstarch, egg, sugar, milk, salt and pepper in the empty corn can (why mess up a clean bowl?). Add to corn and stir to mix. Top with butter chunks. Bake until thick and slightly brown about 25-30 minutes. 4 Servings.
food & drink
Hot Ham and Swiss Sandwiches
1/4 c mayonnaise
1 T poppy seeds
2 T horseradish
2 T onion, grated
1 1/2 c thinly sliced or finely diced ham
8 slices Swiss cheese
4 large rye or whole grain hamburger buns
Mix the mayonnaise, poppy seeds, horseradish and onion together. Place a slice of cheese on a bun, top with ham mixture, and place another slice of cheese on top. Wrap in foil. Heat 30 minutes at 350˚.
I served these with a corn recipe from a cookbook my mother gave me for my birthday last month. Mom plays bridge almost every day at the bridge center in Lubbock, Texas. She’s spoken with her friends their about my blog, and two of the women there mentioned that they’d published some cookbooks. She got them to sign one, and gave it to me for my birthday. It’s called Calf Fries to Caviar, and it’s written by Janel Franklin and Sue Vaughn. It has a lot of recipes that I use often; plus a lot that are new to me. I’d swear that Mom contributed many of the recipes, since Janel and Sue cook a lot like Mom.
Everyone knows what Calf Fries are, right? You know, Mountain Oysters? If you don’t, let me know and I can give you information and a recipe or two. But the recipe I used with my ham sandwiches is called Easy Baked Corn.
Easy Baked Corn
From Calf Fries to Caviar by Janel Franklin and Sue Vaughn
1 15-oz. can cream-style corn
1 T cornstarch
1 egg, beaten
1 T sugar
1/4 c milk
salt and pepper to taste
1 T butter, cut in small chunks
Preheat oven to 350˚. Empty corn into small greased baking dish. Combine cornstarch, egg, sugar, milk, salt and pepper in the empty corn can (why mess up a clean bowl?). Add to corn and stir to mix. Top with butter chunks. Bake until thick and slightly brown about 25-30 minutes. 4 Servings.
food & drink
Miracle Whip, not Mayonnaise
I grew up eating Miracle Whip instead of mayonnaise. Mom made our sandwiches with it, and used it in her potato and macaroni salads, tuna salad, and deviled eggs. My husband grew up eating mayonnaise, but after we married, made the switch to Miracle Whip easily. I do make some things with mayonnaise, and I like it on sandwiches better than Miracle Whip now, but I still stick with Miracle Whip for a lot of my recipes. Mom also used sweet pickles in everything instead of dill, and I prefer sweet even now.
Mom's Tuna Salad

2 hard-boiled eggs, diced
3 large sweet pickles, diced
1 7-oz. pouch albacore tuna (or two 4-oz. cans albacore tuna packed in water)
1/4 c Mirace Whip, or to taste
Mix all ingredients in a small bowl.
Mom's Deviled Eggs

4 hard-boiled eggs, peeled and halved lengthwise
2 T Miracle Whip, or to taste
paprika
Remove cooked yolks from egg halves and place in a small bowl. Add Miracle Whip and stir well with a fork to make a soft, creamy mixture. Fill yolk cavities in egg halves, mounding tops. Sprinkle lightly with paprika.
food & drink
Mom's Tuna Salad
2 hard-boiled eggs, diced
3 large sweet pickles, diced
1 7-oz. pouch albacore tuna (or two 4-oz. cans albacore tuna packed in water)
1/4 c Mirace Whip, or to taste
Mix all ingredients in a small bowl.
Mom's Deviled Eggs
4 hard-boiled eggs, peeled and halved lengthwise
2 T Miracle Whip, or to taste
paprika
Remove cooked yolks from egg halves and place in a small bowl. Add Miracle Whip and stir well with a fork to make a soft, creamy mixture. Fill yolk cavities in egg halves, mounding tops. Sprinkle lightly with paprika.
food & drink
A Decadent Breakfast Treat
Another recipe on my list of things to cook (see this post) was the Blueberry Breakfast bars from Susan of Farmgirl Fare. Her original post is
here. But I’m going to repost the recipe, because it’s soooooo good and needs to be posted again! I had to change one thing, though - I was using frozen blueberries, and didn’t have the three and a half cups her recipe called for. So, since I had frozen cranberries, I added cranberries. Wow! This was sooo good. And I didn’t use any Splenda, so it’s definitely not low carb!
Farmgirl's Blueberry Breakfast Bars
Makes 12 to 16 large bars

Bottom Layer
2 cups old-fashioned oats
3/4 cup all-purpose flour (I use Heartland Mill organic)
3/4 cup (packed) light brown sugar
1/4 teaspoon baking soda
1/4 teaspoon salt
10 Tablespoons (1 stick + 2 Tbsp/5 ounces) butter, melted
1 teaspoon pure vanilla extract
Top Layer
1 cup all-purpose flour
1/2 cup (packed) light brown sugar
1/2 cup (1 stick/four ounces) butter or natural vegetable oil sticks (I use Earth Balance)
Middle Layer
3-1/2 cups fresh or frozen blueberries (I used 2 cups each blueberries and cranberries)
1 teaspoon pure almond extract
3/4 cup granulated sugar
3 Tablespoons all-purpose flour
1/2 teaspoon nutmeg (1/4 tsp. if freshly ground)
For the Bottom Layer:
Heat the oven to 425 degrees F. Grease a 9" x 13" pan. In a large bowl, combine the oats, flour, brown sugar, baking soda, and salt. Stir in the melted butter and vanilla until thoroughly combined. Press this mixture evenly into the bottom of the pan with your fingers. (I also use the bottom of a stainless steel measuring cup to help make the crust flat and even.)
For the Top Layer:
Place the flour, brown sugar, and butter or vegetable oil sticks in a small bowl and use a fork, pastry blender, or your fingers to combine until the mixture resembles large crumbs (some pea-sized clumps are okay). Set aside.
For the Middle Layer:
Place the blueberries in the bowl you mixed the Bottom Layer in and toss them with the almond extract. Pour them evenly over the Bottom Layer in the pan. Combine the sugar and flour and sprinkle it evenly over the blueberries. (Even when wet or frozen, the sugar/flour mixture wouldn't stick to my big fat blueberries when I tried tossing it with them. If yours will, just toss the sugar/flour mixture with the blueberries and then pour the whole mixture over the Bottom Layer in the pan.)
Sprinkle the Top Layer evenly over the blueberry mixture. Bake at 425 degrees F for 15 minutes, then lower the oven temperature to 350 degrees F and bake for another 20 to 25 minutes, until the top is golden, and the edges are starting to brown. Let cool in pan on a wire rack. Store in a cool place or refrigerate. Bars may also be frozen.
food & drink
here. But I’m going to repost the recipe, because it’s soooooo good and needs to be posted again! I had to change one thing, though - I was using frozen blueberries, and didn’t have the three and a half cups her recipe called for. So, since I had frozen cranberries, I added cranberries. Wow! This was sooo good. And I didn’t use any Splenda, so it’s definitely not low carb!
Farmgirl's Blueberry Breakfast Bars
Makes 12 to 16 large bars
Bottom Layer
2 cups old-fashioned oats
3/4 cup all-purpose flour (I use Heartland Mill organic)
3/4 cup (packed) light brown sugar
1/4 teaspoon baking soda
1/4 teaspoon salt
10 Tablespoons (1 stick + 2 Tbsp/5 ounces) butter, melted
1 teaspoon pure vanilla extract
Top Layer
1 cup all-purpose flour
1/2 cup (packed) light brown sugar
1/2 cup (1 stick/four ounces) butter or natural vegetable oil sticks (I use Earth Balance)
Middle Layer
3-1/2 cups fresh or frozen blueberries (I used 2 cups each blueberries and cranberries)
1 teaspoon pure almond extract
3/4 cup granulated sugar
3 Tablespoons all-purpose flour
1/2 teaspoon nutmeg (1/4 tsp. if freshly ground)
For the Bottom Layer:
Heat the oven to 425 degrees F. Grease a 9" x 13" pan. In a large bowl, combine the oats, flour, brown sugar, baking soda, and salt. Stir in the melted butter and vanilla until thoroughly combined. Press this mixture evenly into the bottom of the pan with your fingers. (I also use the bottom of a stainless steel measuring cup to help make the crust flat and even.)
For the Top Layer:
Place the flour, brown sugar, and butter or vegetable oil sticks in a small bowl and use a fork, pastry blender, or your fingers to combine until the mixture resembles large crumbs (some pea-sized clumps are okay). Set aside.
For the Middle Layer:
Place the blueberries in the bowl you mixed the Bottom Layer in and toss them with the almond extract. Pour them evenly over the Bottom Layer in the pan. Combine the sugar and flour and sprinkle it evenly over the blueberries. (Even when wet or frozen, the sugar/flour mixture wouldn't stick to my big fat blueberries when I tried tossing it with them. If yours will, just toss the sugar/flour mixture with the blueberries and then pour the whole mixture over the Bottom Layer in the pan.)
Sprinkle the Top Layer evenly over the blueberry mixture. Bake at 425 degrees F for 15 minutes, then lower the oven temperature to 350 degrees F and bake for another 20 to 25 minutes, until the top is golden, and the edges are starting to brown. Let cool in pan on a wire rack. Store in a cool place or refrigerate. Bars may also be frozen.
food & drink
More Ice Cream, Please!
Since I had a lot of fat-free half-and-half to use up, I decided to make some more ice cream. Next up was some chocolate.
Triple Chocolate Ice Cream
1 1/3 c sugar (I used Splenda)
1/3 c unsweetened cocoa
2 1/2 c 2% milk, divided
3 large egg yolks
1/2 c half-and-half (I used fat-free)
2 1/2 oz. bittersweet chocolate, chopped coarsely
3 t espresso powder dissolved in 2 T hot water
1/3 c semi-sweet chocolate chips, finely crushed
Combine sugar and cocoa in a medium, heavy saucepan over medium-low heat. Stir in 1/2 c milk and egg yolks. Stir in remaining 2 cups milk. Cook 12 minutes or until a thermometer registers 160˚, stirring constantly. Remove from heat.
Place half and half in a microwave-safe dish, microwave at HIGH 1 1/2 minutes or until half-and-half boils. Add chocolate to half-and-half; stir until smooth. Stir in espresso mixture. Add half-and-half mixture to pan; stir until smooth. Place pan in an ice-filled bowl. Cool completely, stirring occasionally. Freeze according to manufacturer's directions. Freeze in freezer additional 1 hour before serving.
This ice cream hardened considerably once it was in the freezer, and I think it was because of the Splenda. But the rich chocolate flavor really hid the Splenda flavor, making this a pretty good low-sugar dessert.
Fresh Peach Ice Cream
3 large, ripe peaches, peeled and finely diced
1/3 c sugar (I used half sugar and half Splenda)
3 T lemon juice
1 c whole milk, well chilled
3/4 c granulated sugar (I used 1/2 c Splenda and 1/4 c sugar)
2 c fat-free half-and-half, well chilled
2 t pure vanilla extract
Combine peaches with sugar and lemon juice and let macerate for 2 hours. Place mixture in a colander, and drain over a large bowl, stirring to mash peaches coarsely. Set peaches aside. Add milk, sugar, half-and-half and vanilla to accumulated peach juices, and stir with a whisk until sugar is dissolved. Turn ice cream machine on, pour mixture into freezer bowl, and let mix about 20 minutes. Add reserved peaches through ingredients spout and let mix another 5 minutes. Transfer ice cream to a freezer-safe container and place in freezer 2 hours before serving.
food & drink
Burnt Sugar Cake and Burnt Sugar Ice Cream
After I saw Beth’s (of zen foodism) post about homemade vanilla ice cream, I decided to dig out my Cuisinart ice cream maker and do some experiementing. First up was a variation of Cuisinart’s recipe for Simple Vanilla Ice Cream. One of my favorite cakes growing up was one called Burnt Sugar Cake, a recipe handed down through my mother’s family. You start by burning (caramelizing) some sugar. I thought that maybe that flavor would be good in ice cream.
To caramelize sugar: Place the called-for amount of sugar in a large, heavy skillet over medium-high heat. Without stirring, heat the sugar until it’s turned dark and liquid. Remove from heat, and add 13 to 1/2 cup of water. Stir. A large amount of the sugar will immediately harden, but you need to stir for about 5 minutes until most of it has dissovled back into the water. The rest of the hardened sugar is stuck to your spoon, and will dissolve if you leave it in the water for another half hour to an hour. You then have a cooled syrup for use in your cake or ice cream recipe.
The cake is a definite sugar high, and the best part of it is the frosting. It’s like candy–fudge, really, since it hardens once you get it on the cake. My brothers and sisters and I always eat the cake part first, leaving an “M”-shaped bunch of frosting to enjoy at the end.
Burnt Sugar Cake
A Morlan/Floyd Family Recipe
3/4 c sugar
1/2 hot water
1 1/2 c sugar
1/2 c shortening
3 eggs
2 1/2 c flour
3 t baking powder
1/8 t salt
1 t vanilla
1 c milk
Caramelize 3/4 sugar by browning it slowly in heavy skillet. Add hot water slowly, stirring until clear. Cool.
Cream 1 1/2 c sugar and shortening. Add eggs. Sift together flour, baking powder, and salt. Add to sugar mixture alternately with vanilla and milk. Add caramelized sugar mixture. Bake in greased layer pans at 350˚ till tests done.
Burnt Sugar Frosting: Caramelize 3/4 c sugar; add 1/2 c hot water. Add 1 stick butter, 3/4 c milk, 1 t vanilla, and 2 c sugar. Cook over medium heat until sotf ball stage. Remove from heat. Beat until dull; quickly frost cake.
Burnt Sugar Ice Cream
1 1/8 c granulated sugar
1 1/2 c whole milk
3 c heavy cream
1 1/2 T pure vanilla extract
Caramelize sugar by browning it slowly in heavy skillet. Add 1/2 c hot water slowly, stirring until clear. Cool. Stick spoon with the rest of the hardened sugar in it in a cup filled with some of the milk. Let stand about a half hour or so, until hardened sugar has dissolved into the milk. In a medium bowl, combine milk and caramelized sugar/water mixture. Stir in the heavy cream and vanilla. Turn ice cream machine on; pour the mixture into freezer bowl, and let mix until thickened, about 20-25 minutes. The ice cream will have a soft, creamy texture. Transfer to an airtight container and place in freezer for 2 hours before serving.
food & drink
Thursday, August 03, 2006
Budget Gourmet
I've never had Beef Wellington. First of all, it must cost a LOT of money, since it's supposed to be made with beef tenderloin. Second, I've never gone to a restaurant that served it. But the idea of beef, with mushrooms, with pate, covered in pastry sounds really good. I found this recipe many years ago, and make it every time I'm in the mood for "something special." It's really easy to make, and the flavors are divine.
Beef Patties En Croute


1 pound lean ground beef
1/2 t salt
1 4-ounce can sliced mushrooms, drained
1/4 lb. liverwurst, cut into 5 slices
2 1/2 t prepared mustard
1 10-count package refrigerated biscuits
Shape ground beef into five 1-inch thick round patties; sprinkle with salt. In 10-inch skillet over high heat, cook patties 5 minutes or until browned on both sides, turning once. Drain on paper towels. Preheat oven to 450F. On lightly floured surface with floured rolling pin, roll one piece of biscuit dough into a 4-inch round. Place a liverwurst slice on center of dough round; top with a beef patty, 1/2 t mustard, and some mushrooms. Then roll another piece of biscuit dough into a 5-inch round; arrange on top of beef patty; press edges together to seal. If you like, cut a small piece of dough from edge of round to make a pretty design to use as a decoration. Repeat to make 5 in all. Place on cookie sheet. Bake 10 minutes or until crust is golden. 5 servings
food & drink
Beef Patties En Croute
1 pound lean ground beef
1/2 t salt
1 4-ounce can sliced mushrooms, drained
1/4 lb. liverwurst, cut into 5 slices
2 1/2 t prepared mustard
1 10-count package refrigerated biscuits
Shape ground beef into five 1-inch thick round patties; sprinkle with salt. In 10-inch skillet over high heat, cook patties 5 minutes or until browned on both sides, turning once. Drain on paper towels. Preheat oven to 450F. On lightly floured surface with floured rolling pin, roll one piece of biscuit dough into a 4-inch round. Place a liverwurst slice on center of dough round; top with a beef patty, 1/2 t mustard, and some mushrooms. Then roll another piece of biscuit dough into a 5-inch round; arrange on top of beef patty; press edges together to seal. If you like, cut a small piece of dough from edge of round to make a pretty design to use as a decoration. Repeat to make 5 in all. Place on cookie sheet. Bake 10 minutes or until crust is golden. 5 servings
food & drink
Lime Jelly, Apple Butter, Pizzas, and Nut Butter
Every once in a while I go on a cooking spree in the kitchen. Today was one of those days. I started with some sweet stuff: Lime Jelly and Apple Butter. Lime jelly is “different,” and can be pretty refreshing on your English muffin or toast during the summer. It’s also one of the easiest jelly recipes to make. Jelly-making is really easy if you’re using fruit juice that you don’t have to strain. It’s when you start with fruit and have to cook and strain that it gets difficult. I like the easy ones. And though I have been cooking with Splenda these days, you have to use real sugar in jelly recipes. I’ve tried the storebought jellies made with Splenda, and don’t care for them at all.
Lime Jelly

6 - 8 medium limes
1 3/4 c water
4 c sugar
Green liquid food coloring
1 3-oz. package liquid fruit pectin
Grate rind from enough limes to measure 2 tablespoons; set aside. Squeeze juice from limes to measure 3/4 cup; pour lime juice through a wire mesh strainer, discarding seeds and pulp. Combine rind, juice, and water in a 4-quart saucepan. Stir in sugar. Bring mixture to a full rolling boil over high heat, stirring constantly. Add 1 or 2 drops of food coloring, if desired. Quickly stir in fruit pectin. Return mixture to a full rolling boil, and boil, stirring constantly, for 1 minute. Remove from heat; skim off foam with a metal spoon. Quickly pour jelly into hot, sterilized jars, filling to 1/4 inch from top; wipe jar rims. Cover immediately with metal lids, and screw on bands. Process jars in boiling water bath 5 minutes. Cool on wire racks. Makes 5 half pints. (Try serving this over a block of cream cheese with crackers as an appetizer; or use as a spread on toast or pound cake. )
I decided next to use up a bunch of apples that I’d bought and discovered weren’t as crispy as I like, and made a batch of apple butter. I bought an apple peeler/slicer a few years ago, and bring it out when I need to peel and slice a large number of apples. It makes short work of them. I really didn’t measure much when I made this, so everything below is just a rough estimate.
Apple Butter

5 pounds cooking apples, peeled and thinly sliced or chopped
1 c apple juice
1 c brown sugar (I bet I could substitute Splenda Brown Sugar Blend here, but I didn’t)
1 t cinnamon
1/2 t nutmeg
Place all ingredients in a large pot stockpot. Cook over medium-low heat about an hour, adding more apple juice if necessary to keep mixture from drying out. Once apple soften and get mushy, mash with a potato masher.
Continue cooking over low heat, stirring occasionally, another half hour or so. Don’t add any more liquid - mixture should darken and thicken. It will have the consistency of applesauce, not store-bought apple butter. Pour mixture into hot, sterilized jars, filling to 1/4 inch from top; wipe jar rims. Cover immediately with metal lids, and screw on bands. Process jars in boiling water bath 5 minutes. Cool on wire racks. Makes about 3 pints.
Once all the mess from the first round of cooking was cleaned up, I decided it was time to make a couple of things I’d posted about back in my “Note to Self - Cook!” post in June. I had made a list of other blogger’s recipes that I wanted to cook, and since I wrote them down and made them public, it became a commitment with a good incentive to make them. First was Pear and Gorgonzola Pizza from Albion Cooks . DH is a pepperoni/sausage pizza eater, and absolutely refuses to eat blue cheese, or even pizza with “stuff like that” on it, so I thought I’d make several small ones, freeze them, and then take them to the office for lunch. I have a refrigerator and a toaster oven at the office, and it’ll be much cheaper (and probably healthier!) to take my own lunches and stay away from all the nearby fast food places. Catherine used pizza dough from Trader Joe’s, and I was going to do the same, but I spotted 8-inch Boboli crusts when I did my commissary shopping Monday. I bought four, and set up a small assembly line. I followed Catherine’s directions, with one exception. I sautéed up two small onions with a pinch of sugar until they were nicely caramelized, and added them to the pizzas.
Pear and Gorgonzola Pizza with Caramelized Onions
(Original recipe from Catherine of Albion Cooks
 this is an uncooked pizza, taken before I added the walnuts and put it into a Foodsaver bag
2 small onions, thinly sliced
1 c water
1 T olive oil
1 t sugar
4 8-inch Boboli pizza crusts
4 t olive oil
2 c shredded mozarella cheese
1 pear, thinly sliced and sprinkled with 2 t lemon juice
1 4-ounce package Treasure Cove blue cheese, crumbled
1/2 c coarsely chopped walnuts
First, steam the onions in the water in a skillet, covered, for about 10 minutes over medium-low heat, or until water has evaporated. Add olive oil and sugar, and continue to sauté until onions are lightly browned. Remove from heat. Brush each pizza crust with a teaspoon of olive oil. Top each with 1/2 cup mozarella, one-fourth of the pear slices, one-fourth of the blue cheese, and one-fourth of the chopped almonds. Bake at 450˚ about 10 minutes.
After the pizzas were all assembled, I vacuum-packed each one with my Foodsaver, and put them in the freezer. Once work starts, I can just take one out, put it in the refrigerator at the office to thaw, and then cook it for lunch!

Next up was Catesa’s nut butter. When she wrote about it in this post , she said she “mixed 1 container peanuts & 1 container of roasted almonds, some groundnut oil, a pinch of salt & a pinch of sugar and blended till it was all creamy and decadent.” I changed her recipe just a bit, since I tasted some honey roasted peanut butter from Whole Foods.

I used a 6 ounce can of Blue Diamond roasted salted almonds, an 8 ounce can of Fisher honey roasted peanuts, a teaspoon of sesame oil and about a teaspoon of vegetable oil (I didn’t have peanut oil). Since the nuts were already salted and honey roasted, I didn’t need salt or sugar. I blended them in the food processor until I had a creamy mixture that looked just like Catesa’s. It went into a jar, but not until I’d tasted it on a graham cracker. Yum! This will be so good when I need a snack. Sometimes I like to eat a heaping spoonful of peanut butter - nothing else - and take a long time to eat it. It’s pretty satisfying, and I learned from the labels on the cans that there’s no carb difference between honey roasted and regular peanuts. Don’t know why, but that’s good for me.
I’m going to take a break now. Maybe even a nap! Then I have to plan dinner. It needs to be something easy, maybe grilled steak. We’ll see.
food & drink
Lime Jelly
6 - 8 medium limes
1 3/4 c water
4 c sugar
Green liquid food coloring
1 3-oz. package liquid fruit pectin
Grate rind from enough limes to measure 2 tablespoons; set aside. Squeeze juice from limes to measure 3/4 cup; pour lime juice through a wire mesh strainer, discarding seeds and pulp. Combine rind, juice, and water in a 4-quart saucepan. Stir in sugar. Bring mixture to a full rolling boil over high heat, stirring constantly. Add 1 or 2 drops of food coloring, if desired. Quickly stir in fruit pectin. Return mixture to a full rolling boil, and boil, stirring constantly, for 1 minute. Remove from heat; skim off foam with a metal spoon. Quickly pour jelly into hot, sterilized jars, filling to 1/4 inch from top; wipe jar rims. Cover immediately with metal lids, and screw on bands. Process jars in boiling water bath 5 minutes. Cool on wire racks. Makes 5 half pints. (Try serving this over a block of cream cheese with crackers as an appetizer; or use as a spread on toast or pound cake. )
I decided next to use up a bunch of apples that I’d bought and discovered weren’t as crispy as I like, and made a batch of apple butter. I bought an apple peeler/slicer a few years ago, and bring it out when I need to peel and slice a large number of apples. It makes short work of them. I really didn’t measure much when I made this, so everything below is just a rough estimate.
Apple Butter
5 pounds cooking apples, peeled and thinly sliced or chopped
1 c apple juice
1 c brown sugar (I bet I could substitute Splenda Brown Sugar Blend here, but I didn’t)
1 t cinnamon
1/2 t nutmeg
Place all ingredients in a large pot stockpot. Cook over medium-low heat about an hour, adding more apple juice if necessary to keep mixture from drying out. Once apple soften and get mushy, mash with a potato masher.
Continue cooking over low heat, stirring occasionally, another half hour or so. Don’t add any more liquid - mixture should darken and thicken. It will have the consistency of applesauce, not store-bought apple butter. Pour mixture into hot, sterilized jars, filling to 1/4 inch from top; wipe jar rims. Cover immediately with metal lids, and screw on bands. Process jars in boiling water bath 5 minutes. Cool on wire racks. Makes about 3 pints.
Once all the mess from the first round of cooking was cleaned up, I decided it was time to make a couple of things I’d posted about back in my “Note to Self - Cook!” post in June. I had made a list of other blogger’s recipes that I wanted to cook, and since I wrote them down and made them public, it became a commitment with a good incentive to make them. First was Pear and Gorgonzola Pizza from Albion Cooks . DH is a pepperoni/sausage pizza eater, and absolutely refuses to eat blue cheese, or even pizza with “stuff like that” on it, so I thought I’d make several small ones, freeze them, and then take them to the office for lunch. I have a refrigerator and a toaster oven at the office, and it’ll be much cheaper (and probably healthier!) to take my own lunches and stay away from all the nearby fast food places. Catherine used pizza dough from Trader Joe’s, and I was going to do the same, but I spotted 8-inch Boboli crusts when I did my commissary shopping Monday. I bought four, and set up a small assembly line. I followed Catherine’s directions, with one exception. I sautéed up two small onions with a pinch of sugar until they were nicely caramelized, and added them to the pizzas.
Pear and Gorgonzola Pizza with Caramelized Onions
(Original recipe from Catherine of Albion Cooks
this is an uncooked pizza, taken before I added the walnuts and put it into a Foodsaver bag2 small onions, thinly sliced
1 c water
1 T olive oil
1 t sugar
4 8-inch Boboli pizza crusts
4 t olive oil
2 c shredded mozarella cheese
1 pear, thinly sliced and sprinkled with 2 t lemon juice
1 4-ounce package Treasure Cove blue cheese, crumbled
1/2 c coarsely chopped walnuts
First, steam the onions in the water in a skillet, covered, for about 10 minutes over medium-low heat, or until water has evaporated. Add olive oil and sugar, and continue to sauté until onions are lightly browned. Remove from heat. Brush each pizza crust with a teaspoon of olive oil. Top each with 1/2 cup mozarella, one-fourth of the pear slices, one-fourth of the blue cheese, and one-fourth of the chopped almonds. Bake at 450˚ about 10 minutes.
After the pizzas were all assembled, I vacuum-packed each one with my Foodsaver, and put them in the freezer. Once work starts, I can just take one out, put it in the refrigerator at the office to thaw, and then cook it for lunch!
Next up was Catesa’s nut butter. When she wrote about it in this post , she said she “mixed 1 container peanuts & 1 container of roasted almonds, some groundnut oil, a pinch of salt & a pinch of sugar and blended till it was all creamy and decadent.” I changed her recipe just a bit, since I tasted some honey roasted peanut butter from Whole Foods.
I used a 6 ounce can of Blue Diamond roasted salted almonds, an 8 ounce can of Fisher honey roasted peanuts, a teaspoon of sesame oil and about a teaspoon of vegetable oil (I didn’t have peanut oil). Since the nuts were already salted and honey roasted, I didn’t need salt or sugar. I blended them in the food processor until I had a creamy mixture that looked just like Catesa’s. It went into a jar, but not until I’d tasted it on a graham cracker. Yum! This will be so good when I need a snack. Sometimes I like to eat a heaping spoonful of peanut butter - nothing else - and take a long time to eat it. It’s pretty satisfying, and I learned from the labels on the cans that there’s no carb difference between honey roasted and regular peanuts. Don’t know why, but that’s good for me.
I’m going to take a break now. Maybe even a nap! Then I have to plan dinner. It needs to be something easy, maybe grilled steak. We’ll see.
food & drink
Tuesday, August 01, 2006
More "Heirloom" Recipes
This afternoon I wanted to do a little baking. I like dates, especially a sugary date loaf candy recipe from my mother, but that recipe is not only time-intensive, but almost pure sugar. So, I looked through my recipes and found a recipe to makeover. The original recipe, which dates back to around 1985, called for sugar, brown sugar, and white flour, so I substituted Splenda, Splenda Brown Sugar Blend, and whole wheat flour. These came out perfectly, and even DH can’t tell there’s Splenda in them. They’re not really low-carb, since the dates are high in sugar, and there are plenty of carbs in the oats and whole wheat flour, but I definitely made them lower carb.
Oatmeal Date Bars

1 c chopped dates
1/2 c water
1/4 c Splenda granular
1 1/2 c quick-cooking oats
1 c whole wheat flour
1/2 c packed Splenda Brown Sugar Blend
1/2 t baking soda
1/4 t salt
1/3 c butter, melted
1 egg white
In a small saucepan, combine the dates, water and Splenda granular. Cook and stir until mixture comes to a boil. Reduce heat; simmer, uncovered, for 5 minutes for until mixture is smooth and thickened, stirring constantly.
In a large bowl, combine the oats, flour, Splenda Brown Sugar Blend, baking soda and salt. Stir in the butter and egg white until blended. Pat half of the mixture into an 8-in. square pan coated with nonstick cooking spray. Carefully spread with date mixture. Gently pat remaining oat mixture over date mixture. Bake at 350˚ for 20-25 minutes or until lightly browned. Cool on wire rack. Cut into bars.
DH’s father, Gene, was a cook in the Army durning the early part of his long career, and from what DH tells me, he was an excellent cook at home. The first time I ate at my in-law’s house, right after our honeymoon in 1981, we had Sausage and Peppers. This is a meal that DH eats until he’s sick, he loves it so. Since there’s just the two of us, I’ve had to cut it in half, and we usually have about one serving of leftovers. Below is the orginial recipe, which serves 4 to 6 people.
Gene’s Sausage and Peppers

8-10 cloves garlic
3-4 T olive oil
2 med. onion
8 -10 green peppers
4 14.5 oz. cans diced tomatoes
1 bunch fresh parsely, chopped, or 1/2 c dried parsley
1 1/2 t salt
1 t ground black pepper
1 T Italian seasoning
6-8 sweet Italian sausages (I’ve never tried the hot ones - they might be good, too)
Slice garlic, saute lightly in oil. Add sliced onion, saute lightly. Add cut peppers, cover and steam about 10 minutes. Add cut tomatoes and coarsely chopped parsley. Season to taste. Cook slowly 3/4 to 1 hour. While the peppers are cooking, cook the Italian sausage in a skillet, then slice into 1/4” slices. Add to peppers and serve in bowls with garlic toast. Serves 4-6
food & drink
Oatmeal Date Bars
1 c chopped dates
1/2 c water
1/4 c Splenda granular
1 1/2 c quick-cooking oats
1 c whole wheat flour
1/2 c packed Splenda Brown Sugar Blend
1/2 t baking soda
1/4 t salt
1/3 c butter, melted
1 egg white
In a small saucepan, combine the dates, water and Splenda granular. Cook and stir until mixture comes to a boil. Reduce heat; simmer, uncovered, for 5 minutes for until mixture is smooth and thickened, stirring constantly.
In a large bowl, combine the oats, flour, Splenda Brown Sugar Blend, baking soda and salt. Stir in the butter and egg white until blended. Pat half of the mixture into an 8-in. square pan coated with nonstick cooking spray. Carefully spread with date mixture. Gently pat remaining oat mixture over date mixture. Bake at 350˚ for 20-25 minutes or until lightly browned. Cool on wire rack. Cut into bars.
DH’s father, Gene, was a cook in the Army durning the early part of his long career, and from what DH tells me, he was an excellent cook at home. The first time I ate at my in-law’s house, right after our honeymoon in 1981, we had Sausage and Peppers. This is a meal that DH eats until he’s sick, he loves it so. Since there’s just the two of us, I’ve had to cut it in half, and we usually have about one serving of leftovers. Below is the orginial recipe, which serves 4 to 6 people.
Gene’s Sausage and Peppers
8-10 cloves garlic
3-4 T olive oil
2 med. onion
8 -10 green peppers
4 14.5 oz. cans diced tomatoes
1 bunch fresh parsely, chopped, or 1/2 c dried parsley
1 1/2 t salt
1 t ground black pepper
1 T Italian seasoning
6-8 sweet Italian sausages (I’ve never tried the hot ones - they might be good, too)
Slice garlic, saute lightly in oil. Add sliced onion, saute lightly. Add cut peppers, cover and steam about 10 minutes. Add cut tomatoes and coarsely chopped parsley. Season to taste. Cook slowly 3/4 to 1 hour. While the peppers are cooking, cook the Italian sausage in a skillet, then slice into 1/4” slices. Add to peppers and serve in bowls with garlic toast. Serves 4-6
food & drink
Subscribe to:
Posts (Atom)